 Cemu Tips and Tricks
- Cemu Tips and Tricks
- How to Configure Gyro
- How to Configure Gyro With External Controllers
- How to Optimize Performance (Power Tools)
- How to Configure Multiplayer
- How to Use the Wii U Pro Controller Configuration
- How to Configure Cemu Native to Work With EmulationStation-DE
- How to Optimize Breath of the Wild
- How to Mod Breath of the Wild
- How to Roll Back Cemu to an Older Version
- How to Configure Language Settings
- How to Configure Online Multiplayer Via Pretendo
How to Configure Gyro
Gyro for Cemu requires SteamDeckGyroDSU. SteamDeckGyroDSU can be installed via EmuDeck, or it can be installed manually.
Gyro only works with the Wii U Gamepad (enabled by default). If you changed your controller layout to the Pro Controller, gyro will not work.
Read How to Use the Wii U Pro Controller Configuration to learn how to apply the Pro Controller layout on a per game basis.
Visit SteamDeckGyroDSU to learn how to install and utilize SteamDeckGyroDSU.
How to Configure Gyro With External Controllers
Some external controllers, including the Sony DualSense and the Nintendo Switch Pro Controller feature gyro controls. Cemu allows you to use this gyro with a little bit of set up.
Here's How
Desktop Mode
- Switch to Desktop Mode
- Exit out of Steam
- You may exit out of Steam a couple of different ways:
- Right click the
Steamicon in your taskbar and clickExit Steam - Open Steam, click the
Steambutton in the top left, clickExit - Open a terminal (Konsole) and enter
killall -9 steam - Do note that clicking the the
Xbutton in the top right of the Steam window will not exit out of Steam
- Right click the
- Your controls will switch to
Lizard Mode. UseL2to right click,R2to left click, and theRight Trackpadto move the mouse - Click the bluetooth icon in the bottom right of your taskbar and connect your controller
- Click the Steam icon in the bottom left of the taskbar and open
Cemu AppImage - At the top of the Cemu GUI, click
Options, clickInput settings - Under the
Controller 1tab, press the-button to the right of theControllerdrop-down twice - The drop-down box will be empty and your controls will no longer be mapped, this is expected behavior
- Under the
Controller 1tab, press the+button to the right of theControllerdrop-down - Select
SDLControllerfor theAPIdrop-down and select your controller under theControllerdrop-down - Click the
Addbutton and Cemu will auto-map your controls - Click the
Settingsbutton under the drop-down with your controller name - Check the box to the left of
Use motion - Click the
OKbutton - Give the profile a unique name under the
Profiledrop-down box at the top and clickSave - Your controller is now configured with gyro, proceed to the
Game Modesection to start using your controller inGame Mode
Game Mode
- In Game Mode, connect your controller
- Select your Wii U game
- On the
Playscreen, select theControllericon to the right of the screen - Select your controller tab at the top
- Click the
Gearicon to the right, and clickDisable Steam Input - You may need to restart first for this setting to properly apply
- Your controller's gyro will now work for this selected game, repeat as needed for your other games
Post-Configuration
This section went over creating a new Player 1 profile for your external controller.
To switch between your new controller profile and the Steam Deck controller profile, open Cemu and open the input settings, select your preferred option in the Profile drop-down menu and click Load.
To switch back to the Steam Deck controls, select the Deck-Gamepad-Gyro profile:

(Optional) To restore Steam Input:
- Select your Nintendo Wii U game
- On the
Playscreen, select theControllericon to the right of the screen - Select your controller tab at the top
- Click the
Gearicon to the right, and clickEnable Steam Input - You may need to restart first for this setting to properly apply
- The controls will be reverted to Steam Input and the Steam Deck controls will be restored
How to Optimize Performance (Power Tools)
Visit Power Tools to learn how to optimize performance using Power Tools.
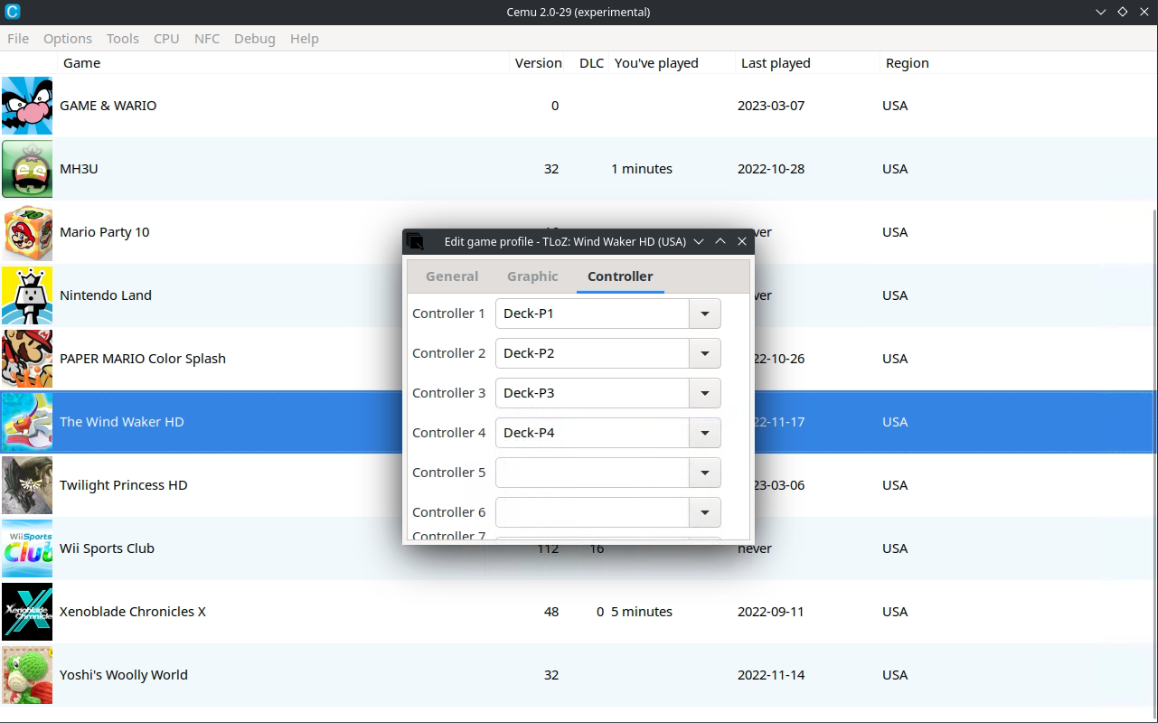
How to Configure Multiplayer
- Open Cemu
- It's recommended you enable multiplayer on a per-game basis. Turning on additional controllers can disable single player controls in a handful of games
- Right click a game, click
Edit Game Profile - Click
Controller - To the right of each Controller (
Controller 2throughController 4), select the respectiveDeck #profile (Deck 2 for player 2 and so on) - (Optional) You may need to re-arrange the controller order in Game Mode for your controllers to function as expected. See How to Re-Arrange the Controller Order for more information
How to Use the Wii U Pro Controller Configuration
In some some games, the initial screen will prompt for a controller configuration: Wii U Gamepad or Wii U Pro Controller. Some games will automatically switch to the Wii U Pro Controller configuration if you choose it.
For example: 
If you prefer to use the Wii U Pro Controller layout, you need to change the controller profile in Cemu. Make sure to change controller profiles on a per-game basis so it is persistent on EmuDeck updates.
Tutorial
- Right click the game, click
Edit game profile - Click the
Controllertab - Change the profile to
Deck-P1
- When you launch a game, one of the following two things will happen:
- Some games will prompt you to choose a controller layout, select the
Wii U Pro Controller - Some games will automatically switch to the
Wii U Pro Controllerconfiguration
How to Configure Cemu Native to Work With EmulationStation-DE
In order to use Cemu Native through EmulationStation-DE, you will have to enable it in the settings menu.
Here's How
- Open EmulationStation-DE
- Press
Start - Press
Other Settings - Press
Alternative Emulators - On
Wiiu, selectCemu [Native]
How to Optimize Breath of the Wild
IMPORTANT: You need Version 208 of Breath of the Wild to use FPS++. Read How to Manage DLC and Updates to learn how to install game updates for Cemu.
How to Configure Cemu
- In Desktop Mode, open
Cemu AppImage - Right click
Breath of the Wild, clickEdit graphic packs
- Click
Download latest community graphic packs - Click the
⌄to the left ofMods - Check the box to the left of
FPS++ - Change the mode to
Advanced Settings - Change the
Framerate Limitto40FPS
- Close out of Cemu
How to Configure Game Mode
- In Game Mode, open Breath of the Wild
- Click the
...(the QAM) button - Click the battery icon
- Click
Advanced View - Enable
Use per-game profile - Set the refresh rate to 40

After doing the steps in the above two sections, Breath of the Wild will run at a stable 40 FPS with temporary occasional hiccups in new areas while it compiles shaders.
How to Mod Breath of the Wild
This section will cover how to mod Breath of the Wild using UKMM, a mod manager.
- In
/home/deck/Applications, create aukmmfolder - These folders are recommendations, you may use a folder of your choice but you will need to adjust any paths in future steps to the folders you select
- Download the latest
ukmm-x86_64-unknown-linux-gnu.tar.xzfile from https://github.com/NiceneNerd/UKMM/releases to/home/deck/Applications/ukmm - Right click
ukmm-x86_64-unknown-linux-gnu.tar.xz, clickExtract archive here - If it creates a subfolder, move the contents directly to
/home/deck/Applications/ukmm - Download the attached
.shfile and place it in/home/deck/Applications/ukmm - ukmm-launcher.sh
- For the contents of the script, see https://raw.githubusercontent.com/EmuDeck/emudeck.github.io/main/docs/configuration-files/ukmm-launcher.sh
- If you used a different folder than what was recommended in Step 1, make sure to open
ukmm-launcher.shin Kate or a text editor of your choice and update the paths to where you placed UKMM - Right click
ukmm-launcher.sh, clickProperties, clickPermissions, checkIs Executable - Use this file whenever you want to launch UKMM
- You may add UKMM to Steam by right clicking it and clicking
Add to Steam - Double click
ukmm-launcher.shto open it - Follow UKMM's documentation, https://nicenenerd.github.io/UKMM/using-mods.html to learn how to mod Breath of the Wild
- When deploying mods, the graphic pack folder will be located here:
/home/deck/.local/share/Cemu/graphicPacks
How to Roll Back Cemu to an Older Version
Preface
Your ROMs launch using a script created by EmuDeck, cemu.sh in Emulation/tools/launchers.
The script launches the corresponding emulator in /home/deck/Applications and specifically looks for two traits:
- The most recently downloaded version of the emulator in
/home/deck/Applications, based on the file/release date. - The emulator name at the beginning of the file. Anything after the emulator name is ignored.
- For example, if the latest version of the emulator is
1351and you would like to downgrade to1349. When you download version1349, you could rename it toEMULATORNAME-1349.AppImage, and EmuDeck's script will ignore the-1349in the file name, allowing you to record which versions of the emulator you are using through the file name.
How to Roll Back Cemu
- Download the version of the emulator you would like to use from Cemu's GitHub: https://github.com/cemu-project/Cemu/releases
- Move the downloaded emulator from Step 1 to
/home/deck/Applications - (Optional) Rename or delete the original emulator file
- Right click the newly downloaded emulator, click
Properties, clickPermissions, checkIs executable - Your games will now launch using the version of the emulator you downloaded
How to Configure Language Settings
UI
- In Desktop Mode, open Cemu
- Click
Optionsat the top - Under
Interface, click theLanguagedrop-down menu and select your preferred language - Restart Cemu
In-Game
- In Desktop Mode, open Cemu
- Click
Optionsat the to - Click
Console languageand select your preferred language
How to Configure Online Multiplayer Via Pretendo
You need a physical Wii U to play online multiplayer via Pretendo. You cannot play online multiplayer without a physical Wii U.
For instructions on how to dump the online files from a Wii U, see https://cemu.cfw.guide/using-dumpling.html#copying-online-files-to-cemu.
For more information on Pretendo, see https://pretendo.network/.
For Pretendo's installation instructions, see https://pretendo.network/docs/install/cemu.
- From your Wii U, you will need to dump two files:
otp.binandseeprom.bin - On the Steam Deck, place these two files directly in the
$HOME/.local/share/Cemufolder - Folders with a
.(.var,.local,.config, etc.) at the beginning are hidden by default. In Dolphin (file manager), click the hamburger menu in the top right, clickShow Hidden Filesto see these folders - In Desktop Mode, open Cemu, click
Options,General Settings, clickAccount, select yourPNIDin theActive Accountdrop-down menu and selectPretendounderNetwork Service - Pretendo is now configured for Cemu